Configuring OpenID Connect for AFAS.
This guide provides the steps required to configure OpenID Connect for AFAS, and includes the following sections:
Prerequisites
Before stating the configuration, first make sure you can log in, in the AFAS Online Portal as the portal administrator with regard to single sign-on.
Please follow the 'Recording the Profit administrator for the protal' paragraph here to set this up correctly.
Configure Okta
In the sign-on tab select OpenID Connect.
Copy the client Secret.
In Advanced sign-on settings fill in the Afas Tenant ID.
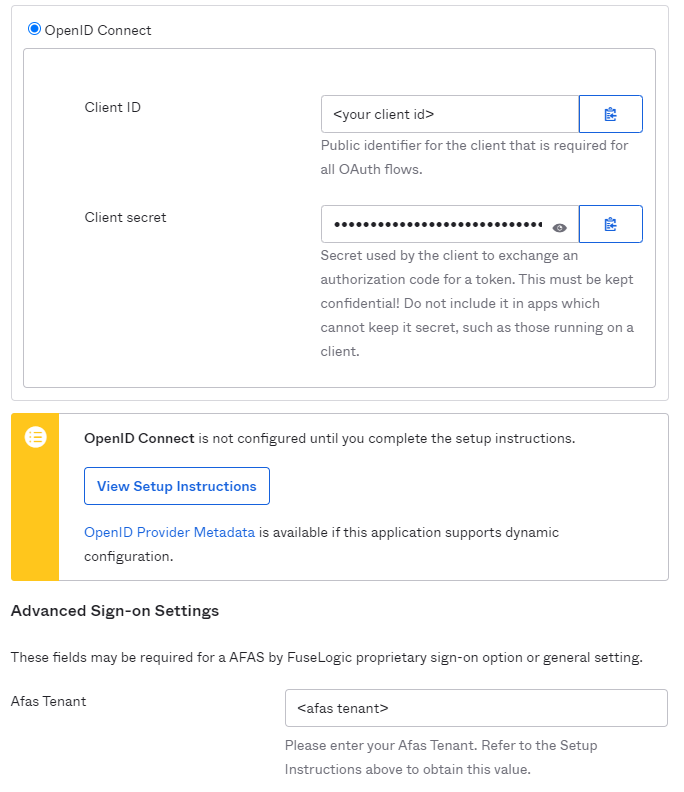
The tile generated by this application will start "https://login.afasonline.com/<afas tenant>". If you want to link to another page, do not display the application icon, instead create a bookmark application with the preferred url.
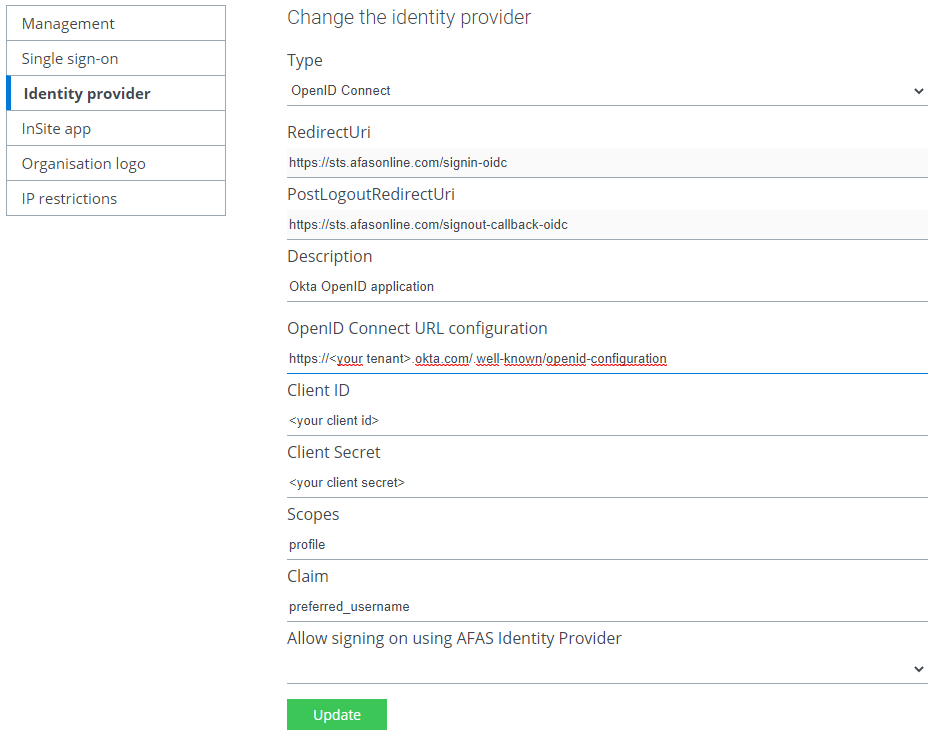
Configure AFAS
- Go to afasonline.nl.
- Sign on as administrator using two-factor authorisation.
- Go to tab: Management -> Identity Provider.
- Type select:
OpenID Connect - Description:
Okta OpenID Identity Provider - OpenID Connect URL Configuration: https://<your base okta url>/.well-known/openid-configuration
- *Note that the domain in the URL above has to be adjusted if your Okta environment leverages the custom domain functionality.
- Type select:
- Client ID: <your client id>
- Client secret:
<the value copied in Configure Okta> - Scopes:
profile - Claim:
preferred_username - Allow signing on using AFAS Identity Provider:
No, users must always sign on using this Identity Provider. - Go to tab: Management -> Single Sign On.
- For each application, select the identity provider you want to user: the Okta OpenID Identity Provider or the standard AFAS Identity Provider.
- Click Test to test the Identity Provider.
- Enter the UPN for an administrator.
- Login to Profit.
- Go to General -> Management -> Auhorisation tool.
- Open the properties of the user.
- Enter the UPN (in most cases this is the work email of the users).
- Click on OK.
- Test the sign-on method using the administrator.
- Assign the administrator to the App in Okta.
- Have the administrator click on the AFAS tile in the Okta dashboard.
- Notice the administrator is loggied in to AFAS.
- Enter the UPN for all users.
- The UPN of the users must be entered before they can sign on using single sign-on.
- If you are doing this for a limited number of users, enter the UPNs manually. See for an explanation the section above: Enter the UPN for an administrator.
- If you have a large number of users for whom the UPN field must be entered, you can import them through the import ‘User entry’. See Importing users.
Known Issues/Troubleshooting
- If you have trouble setting this up, you can also look at the general AFAS Configure single sign-on page.